
How To Fix Disk Stuck At 100% In Windows Task Manager will be described in this article. Have you ever noticed that your disk usage is fixed at 100% when you launch Windows Task Manager? Or is the disk space on your machine 100% full? Due to the slow and sluggish operation of your computer, this may be a bothersome issue. Unfortunately, Windows 10 and Windows 11 are both affected by this problem. Nonetheless, there are a few actions you can do to resolve the issue. Without further ado, let’s look at some possible causes for this issue.
How To Fix Disk Stuck At 100% In Windows Task Manager
In this article, you can know about How To Fix Disk Stuck At 100% In Windows Task Manager here are the details below;
What Does the “System Using 100% Disk” Means in Windows PC/Laptops?
The amount of data that is read or written to the hard drive in Windows is referred to as disk use. All available resources are being used to transfer data to and from the hard drive when the disk usage is 100%. The computer may become uncooperative and run slowly as a result of this.
Disk Stuck At 100% in windows task manager reasons
Your Windows 10 disk usage may be stuck at 100% for a number of reasons. These include:
Utilizing Too Many Apps at Once: An excessive number of background processes may be the reason for an increase in disk use.
Disk problems: The “chkdsk” command must be used to fix disk problems, which might result in excessive disk consumption.
High System Workload: Disk use may result from a PC that is overworked.
Inadequate RAM: A computer that lacks RAM will use its hard drive as virtual memory, which will increase disk utilization.
Superfetch Service: Excessive disk use may result from a malfunctioning Superfetch service.
Third-party Programs/Browsers: High disk consumption may result from third-party programs that sync files continuously, like Dropbox or Google Drive.
Hardware Issues: In some cases, high disk utilization can be linked to hardware problems, such as a broken hard drive.
After learning about disk consumption and the reasons behind 100% disk use in Task Manager, let’s look at potential fixes.
How to quickly fix disk Stuck At 100% in windows task Manager?
Restart PC/Laptop
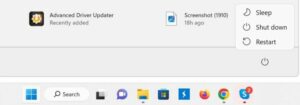
Usually, restarting your laptop or PC produces great outcomes. Your computer’s RAM will be cleared during a clean start, eliminating any temporary files and programs that are causing it to lag. Performance can be improved & memory leaks can be fixed as a result. Rebooting your computer could be necessary to reduce the high disk utilization, though. To restart, click the Windows icon, select Power, and then click Restart.
Scan Hard Disk
Your hard drive’s malfunctioning sectors may be the cause of Windows’ 100% disk utilization issue. Using Windows’ built-in Scan drive feature may help to resolve this. To do this, take the actions listed below.
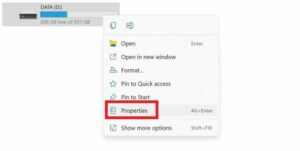
1 – To open This PC, double-click on its desktop.
2 – Select Properties with a right-click on your disk.
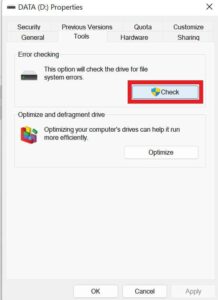
3- 100% Stuck on the Disk Task Manager for Windows Select Tools from the menu at the top of the dialogue box.
4-Click Check in this section.
5- 100% Stuck on the Disk Choose Scan drive in Windows Task Manager
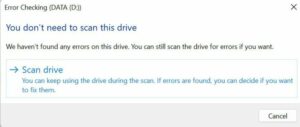
6- 100% Stuck on the Disk Task Manager for Windows
The system will scan the industry while you wait; a complete disk repair can also necessitate a reboot. But this ought should fix the issue.
Disable Windows Search
Windows Search can quickly search the files on your PC. But if you never use it, you may turn it off entirely. To halt this procedure, take these actions.
1-Right-click the Windows icon in the Taskbar and choose Windows Terminal (Admin).
![]()
2- 100% Stuck on the Disk Task Manager on Windows – Enter the command by typing it in and hitting the Enter key.
Stop “Windows Search” with net.exe.

See whether the disk utilization and performance of your PC improve. If the answer is true, use the actions listed below to permanently turn off Windows Search.
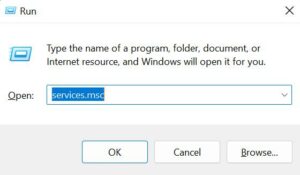
1 – To enter the Run dialogue box, press the Windows key along with the R key.
2 – Type services.msc at this point and hit Enter.
- To access Windows Search, scroll down and double-click on it.
4-Tap the arrow down sign in the Startup type font of the Windows Search settings window, then select Disabled.
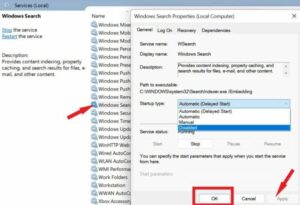
5- Click Apply & OK to save the modifications.
Disable Superfetch (SysMain)
The issue with Windows 10’s 100% disk consumption has also been linked to the Superfetch function. After Windows 10 was updated in October 2018, this was renamed “SysMain.” Use the instructions below to turn it off.
1-Right-click the Windows icon in the Taskbar and choose Windows Terminal (Admin).
2-Input the command below and hit the Enter key.
Change Energy Options
A frequent workaround for the issue that causes Windows to occupy 100% of the available disk space is to switch to high-performance mode. Naturally, this has the drawback of using more power on your computer. Given the architecture of contemporary chips, this should work well. The battery life of computers and notebooks may still get shorter. Also check Safeco Login
1 – Select Power Options by doing a right-click on the Windows icon in the Taskbar.
![]()
2-Tap the Power mode drop-down arrow icon, then select Best performance.
![]()
3- Restart your computer & see if the amount of disk space used has reduced.
Run a disk check.
You should look for unwanted files on your hard drive if none of the aforementioned methods resolve the issue. An excellent program for examining every file on your hard drive is Disk Analyzer Pro. You may rapidly inspect the files and remove the unwanted ones after classifying them into the appropriate categories. Also check WMLink 2step Verification On WalmartOne
1- On your laptop or the PC, download and install Disk Analyzer Pro.
2 – After that, select the disk to scan and press the Start Scan button.
3 – After the analysis is finished, the software window will show how your files are categorized into several groups.
4-You may view a category by double-clicking on it. A new window containing a list of the files will then open.
5- A new window with the file names and information (location, size, and type) will show up.
6- Click a file to open or remove it.
Conclusion:
If Windows Task Manager shows that your disk is stuck at 100%, you can try these fixes. You are welcome to review each one independently, and I hope you find them useful. And kindly correct any other solutions you may know of in the space provided for comments below.