How To Build Your Own Gaming PC Complete Guide will be described in this article. Video games have evolved to become more epic, realistic, and enjoyable. But to handle today’s PC games, you need some serious processing power for the best experience. We’ll walk you through creating the ideal gaming PC from scratch in this article. Not having to purchase a pre-built machine will save you money, and making it will be enjoyable as well!
How To Build Your Own Gaming PC Complete Guide
In this article, you can know about How To Build Your Own Gaming PC Complete here are the details below;

What parts do you need for a gaming PC?
Let’s go over the fundamentals first before getting into our recommendations. The components required to assemble a full gaming PC are listed below.
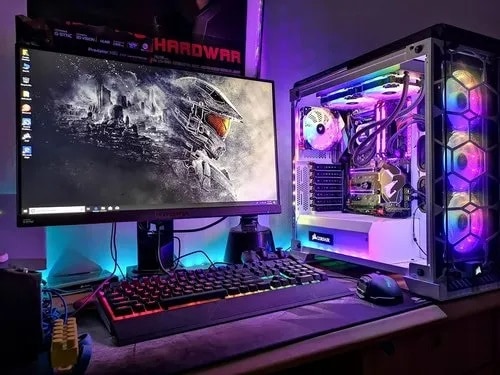
On my PC, the cabling is still a little messy, but it is entirely mine and not factory-built. Additionally, I was able to save some cash.
The processor
The central processing unit, often known as your processor, is what powers your computer. It is in charge of the majority of the tasks that your computer completes. We advise choosing a CPU with at least six cores, either AMD or Intel, if you plan to game.
Thanks to its aggressive pricing strategy, AMD is quite competitive in the current processor industry; nonetheless, Intel continues to dominate the gaming space. These days, games require CPUs with faster clock rates, which their higher-end models can achieve. Overclocking your CPU can be something you want to consider if you’re creating your own computer.
Memory/RAM
We define RAM here, but how much is needed for gaming? The industry norm for RAM size is sixteen gigabytes. This is still more than sufficient to run all current games without any issues. Upgrading to 32 GB of RAM had little to no impact on performance in our tests. For this reason, I stayed with 16 GB but made an investment in higher-quality memory that has low latency and high frequency (to learn more about what all that entails, check the RAM link just above).
Graphics card
The graphics processing unit, or GPU, is crucial for gaming. Most likely, the most expensive component of any gaming PC will be your GPU. The price of a graphics card can range from about $200 for low-cost Full HD gaming to over $1,500 for really powerful GPUs that can run 4K ultra fluently.
By updating your graphics drivers and overclocking your GPU, you can get the best gaming performance out of your graphics card.
Hard disks
Invest on an SSD. Clearly. The era of antiquated mechanical disks is ended (if you’re not sure why, see our overview on the differences between an SSD and an HDD). No gamer should have to endure endless (excuse the pun) loading screens, even when those older disks are still less expensive and occasionally larger. You can reach up to 5 GB/s with an SSD, especially the latest NVME variety. Additionally, you should purchase at least 1 TB of storage space because modern games can use up to 100 GB of space.
In any case, it’s critical to set aside enough room for the games you choose to play. The integrated Disk Cleaner in Avast Cleanup will automatically remove junk files and other superfluous programs, making room for the upcoming blockbuster movie.
Power supply
A power reserve with at least 700 to 1200 Watts might be something you want to acquire if you’re building a more robust system with a higher-end card and processor.
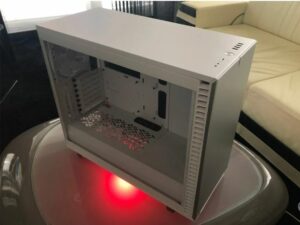
Case
Here’s where you can use your imagination. One can choose between a stylish case such as the Fractal Design R7 and a more distinctive one like the Thermaltake View 71 or the Snow Helicopter.
Make sure the case you select is an E-ATX case. For full-size PCs, that is the standard, and choosing the appropriate motherboard is crucial. Although there are smaller cases for tiny PCs, we’ll concentrate on mid-sized to big PC towers in this article because they have greater components and better airflow.
Other components you’ll need
Without the right accessories, no gaming PC is complete. The following are the essentials for your gaming PC:
- A gaming display: It’s likely that the resolution of your old TV or monitor isn’t high enough for the best gaming experience, and it might not be able to handle the high refresh rates that give games their fluid, accurate motion. Make sure the monitor or TV you’re buying supports 4K (3840 x 2160) or WQHD (2560 x 1440) resolutions. Furthermore search for refresh rates of 120 Hz or above. Although 60 Hz (for 60 frames per second) seems smooth at first, you won’t go back once you see refresh rates exceeding 120 Hz.
- Controller: Many third-person action games are best played with a dedicated controller, even though a mouse and keyboard provide accurate control for real-time strategy and shooter games. Although it is expensive, my personal favorite is the Microsoft XBox Elite Controller 2. Although it costs an eye-watering $179, you get the best material quality, substantial weight, wireless charging, and switchable buttons.
- Your normal set of mouse and keyboard is not designed for gaming. Particularly while searching for a mouse, you should consider particular gaming accessories. For instance, the new G604 mouse from Logitech features twelve configurable buttons and blazingly quick scan resolution.
- Windows: Windows 10 is required in order to run modern games. Fortunately, licenses aren’t too costly, so Windows 10 Home ought to be available for less than $50.
What kind of games do you play?
A gaming rig can easily cost up to $5,000, with prices starting as low as $500. The games you play should be a major consideration when determining what parts to buy and how much money to invest in your gaming PC.
Low-end games
Games that are over five years old, web games, and simpler 2D strategy games are all considered low-end games. This doesn’t need a lot of power. Since most of these games can be played on standard office or multimedia PCs or desktops, building a gaming PC is actually not necessary if that is all you want to play.

Mid-range and online multiplayer games
Multiplayer tournaments such as League of Legends, DOTA, Fortnite, Valorant, and Minecraft are all well-suited for multiplayer play. Even on less powerful PCs, they will function flawlessly.

Top-tier games
You should absolutely spend some money on your gaming PC if you enjoy watching the newest blockbusters and want to experience every last pixel – you’ll need at least a mid-range graphics card.
a 4K Ultra settings screenshot of the high-end game Horizon Zero Dawn (img_04A).

Decide what resolution you want
Now let’s address the more crucial query: What kind of resolution are you seeking? Full HD (1920 x 1080) & the QHD (2560 x 1440), and 4K (3840 x 2160) are the most popular resolutions. Full HD is the only resolution that the majority of TVs and screens that have been sold in the previous ten years support; higher resolutions offer more visual fidelity, while Full HD offers less.
QHD is supported by a lot of gaming displays, offering a noticeable fidelity improvement over standard Full HD screens. These days, almost every TV sold has 4K, which quadruples the pixel density of a standard PC.
The specifications for your PC hardware will vary greatly depending on the type of screen you currently own or wish to purchase. This is because your PC needs to utilize more power to run greater resolutions.
After you’ve worked this out, it’s time to put your PC together. Based on the resolution you have in mind, we have suggested the following specifications.
Full HD gaming: what you need
Budget: $900
- Processor: ~$200 AMD Ryzen 3600 (6 cores, 4.2 GHz)
- RAM: ~$75 Ripjaws V: G.SKILL F4-3600C19D-16GVRB
- Water cooler: Cooler Master ML240, around $80
- Asrock B450M motherboard, around $80
- GPU: AMD Radeon RX580, about $180
- Hard drive: ~$100, Crucial P1 1TB 3D
- Power source: ~$90 for Cooler Master MasterWatt 550
- Thermaltake S300 case: $80
- Approximately $885 total was spent.
This setup is built around a modern AMD CPU with six cores. You’ll notice a substantial gain in performance because games operate better on CPUs with at least four cores. In addition, we installed RAM with a faster clock speed of 3600 MHz, and most importantly, we selected the RX580 as the greatest low-cost graphics card available.
Even at high settings, this ought to be plenty to offer you more than 60 frames per second in many modern games. This build is more future-proof; at the absolute least, it should let you play the newest games for the next few years. Sure, you could spend less on the processor or graphics card and still obtain 60 frames per second in current games.
Considering how much disk space games often require, we decided not to spend the extra money on a 500 GB drive. You’ll become tired of always having to remove and reinstall games because of space issues. Although the 1 TB disk we selected is not the fastest available, most games should load swiftly at 2 Gbps.
QHD gaming: essential requirements
Budget: $1,600
- CPU: 4.8 GHz, six core Intel 10600k: around $290
- RAM: ~$75 Ripjaws V: G.SKILL F4-3600C19D-16GVRB
- Water cooler: Cooler Master ML240, around $80
- Motherboard: VISION G GIGABYTE Z490: around $200
- EVGA GeForce 2060 Super graphics card: around $425
- Samsung 970 Evo hard drive: around $180
- EVGA 700 BR power supply: around $100
- Thermaltake View: about $180
- Approximately $1,530 was spent overall.
Going up the food chain: More CPU and GPU power is required for a smooth QHD (2560 x 1440) frame rate. Since Intel’s CPUs have a greater clock speed than AMD’s, we choose them for that.
In our tests, a 2060 Super GPU and a fast Intel CPU yielded an amazing average frame rate of 90 frames per second for the ten games we tried. With this card, Grand Theft Auto V, Wolfenstein: Youngblood, and Fortnite all produced frames per second of greater than 100. That type of show would have cost you $3,000 just two or three years ago!
Regarding the hard drive, we opted for a quicker 1 TB Samsung 970 Evo.
4K gaming: what you need to know
Budget: $3,300
- Intel 10900k CPU (10 cores, 5.2 GHz): about $760
- RAM: ~$370 RAM: G.Skill Royal Z 4266 MHz
- GPU: $1,150 for the EVGA GeForce 2080 Ti
- Heattake 360 RGB Sync cooler: around $160
- Motherboard: ~$390 MSI Z490 Meg Ace
- EVGA SuperNOVA 1200 P2 power supply: around $320
- Fractal Design Define R7: around $150
- Approximately $3,300 was spent overall.
These parts basically match the computer I constructed in order to write this post. The PC was designed from the ground up to provide the best possible 4K resolution and detail levels.
We’re starting with an Intel Core i9 10900k, which has 10 cores and can run at up to 5.2 GHz. It is the top gaming CPU from Intel right now. It lacks the AMD Ryzen’s (which has even more cores) multimedia and productivity capabilities, but its high clock rate provides it a significant advantage in gaming.
We’ve switched to lightning-fast 4266 MHz RAM sticks for the RAM, and the powerful 2080 Ti is the top GPU that we suggest.
We are utilizing a 360mm Thermaltake liquid cooler to keep everything cool. It’s everything a gamer could ask for when paired with a stylish Fractal Design case.
Prepare your workspace
Locate a roomy, well-lit area large enough to accommodate all of your components. I’m sure you can find a better location, but in my case, this was the kitchen counter. Interestingly enough, a standard screwdriver was all I really required, although you should probably get ready because some parts and cases might be more difficult to handle. This is what you require:
- Anti-static gloves and pad: You can create static electricity simply by moving around on a carpeted floor. An anti-static pad will eliminate the risk of damaging components such as a motherboard or GPU by touching them.
When handling your equipment, your anti-static cushion will help shield it against dents and scratches. I placed my gear on a bigger microfiber blanket that is anti-static. Anti-static gloves are also advised in order to completely avoid any discharge. These are readily available at Amazon, Newegg, or your own neighborhood store.
- Screwdrivers: Get a typical screwdriver set if your home does not already have every screwdriver you require.
- Thermal paste: Before attaching the cooler, you must apply this paste to your CPU (more on that below). But some coolers come with thermal paste already applied, like the Thermaltake 360 RGB that I purchased for my build.
Assemble your new PC
After you’ve bought the parts, let’s prepare your beast. This is a detailed how-to for assembling a gaming PC:
1. Get the case ready
The majority of the time, the casing is pre-assembled in the package, so all you really need to do is install the parts.
My case required some cabling. Can you see the power button and USB ports on top? That meant that to connect it to the motherboard, I had to insert a cable and run it through the rear.
To make room for the graphics card, you’ll also need to remove the covers from the backside slots. If you have more fans, now would be an excellent time to install them.
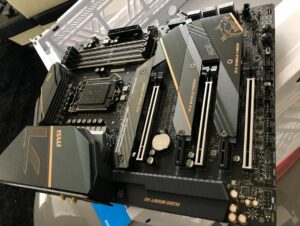
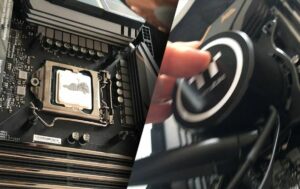
2. Prepare the motherboard
Place the motherboard in later. Installing the processor and memory should come first. In any case, prepare all of the cords.
A motherboard manufactured by MSI, model number MSI Meg Z490.
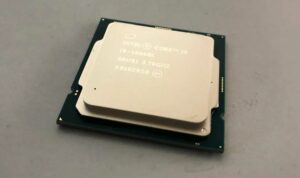
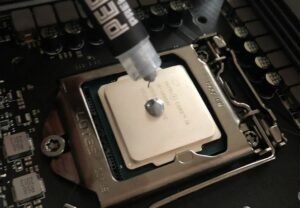
3. Put in the CPU
Lift the motherboard cover and place the CPU inside. Its small notches on either side will help you determine the proper angle.
A CPU with the Intel Core i9 10900k architecture.
4. Assembly the liquid cooler
I can safely direct you to the Thermaltake user guides because we suggest these coolers for our builds. Go to the Thermaltake website’s downloads section, choose User Manual from the menu on the left, and choose your product category and model from there. These instructions are really helpful and ensure that all of the connections are connected properly. It’s not a really difficult profession, but it can take some adjusting.
Ensure that the parts you’re using match the correct processor, as AMD and Intel chips differ in size and form.
5. Time to get greasy
Let’s coat that processor with some thermal paste:
6. Put the liquid cooler on
Make sure nothing is loose when you firmly screw in the liquid cooler from the motherboard’s rear. Next, attach the FAN and PUMP cables to the motherboard’s relevant ports.
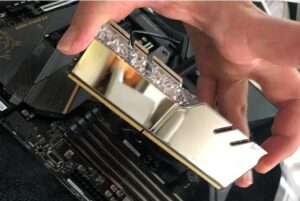
7. Put in those two RAM modules
Place RAM modules A2 and B2 in the event that you have two of them. Place the one you have in the A1 slot. Avoid touching the gold connectors on your RAM module or modules; instead, hold them by their sides.
Carefully place the RAM into the motherboard of the computer, taking care not to touch the gold connectors!
Observe the small opening where “M2” is written. This is where your new, small SSD hard drive has to be plugged in. This was protected by a heat dissipator on my motherboard. It’s essentially the same as plugging in a thumb drive aside from that.
8. Here comes the fun part!
Place the motherboard within the case and tighten the screws. See how one side has the ports? Place them in line with the gaps in your case.
All of the ports on the motherboard should be oriented correctly when it is inserted into a PC chassis.
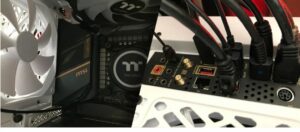
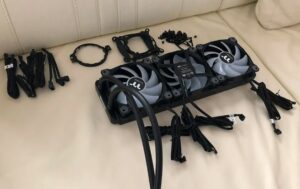
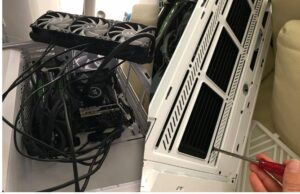
9. Install the water cooler
Install the water cooler on the top or bottom of your case at the same time. It goes on top in my example. The liquid cooler is being installed and screwed into the case. For me, this was the most difficult part because liquid coolers often have quite long connections to run the fan and light. I was fortunate enough to feed them through the back end of my case.
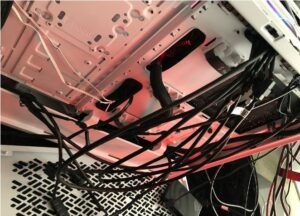
A computer case featuring cooling wires that extend from the rear side of the case. Here’s where cable ties come in to help keep even the rear of your specially constructed machine tidy. At this point, you shouldn’t just stuff it back there and cover it with the side plate of the case like I did. It would be akin to vacuuming under your carpet. (Don’t worry, I fixed it later. I returned!)
10. Insert the power supply
Connect the main connector to the motherboard and insert the power supply now. It is the biggest one in the group.
11. Install the graphics card
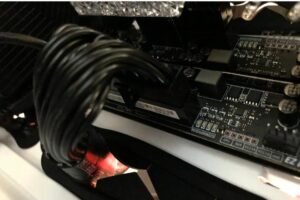
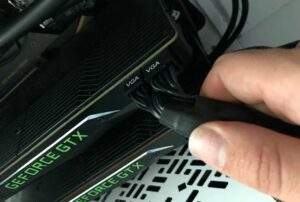
The graphics card will now be installed. See your mainboard’s three or four broad slots? When the graphics card is almost in, press it firmly and carefully insert it so that the pins line up. A little hatch is there that fastens into position.
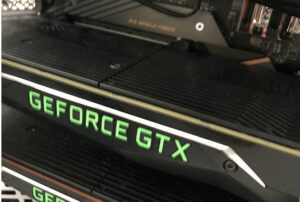
A motherboard with an NVIDIA GeForce GTX graphics card installed.Next, connect it to your power supply using one of the VGA power cords that were included with it. Attaching power wires to the graphics card is what’s being shown in the caption.
12. Boot up and give it a spin!
Okay, that ought to do it! Are you prepared for this momentous occasion? Connect your mouse and keyboard via USB, your PC’s power cable, and the HDMI or Displayport cable of your monitor. Just the necessary plugs should be inserted for the initial boot.
Press the POWER button and hope that everything is connected correctly! But don’t worry—your motherboard will simply shut down the computer or halt all processes to display an error signal and avert further damage if something is not connected correctly.
Troubleshooting
Have you recently attempted to power on your computer for the first time but were unsuccessful? Does the screen remain dark? The difficult part will now be determining what’s wrong!
The gaming PCs I’ve built in the past weren’t quite as cooperative as my present setup, which came on for the first time and astonished me, to be honest. This is how I responded to it.
Just connect the essentials
Link your keyboard, mouse, and monitor together. Nothing more. Any USB drive could interfere with the startup of your computer.
Try a different display.
It’s possible that your new PC will boot up with a display resolution that isn’t compatible with your screen, particularly if it’s linked to a TV or projector. Attach it to a standard display.
Check and reconnect all the cables
Verify that you have all the correct cables plugged in. After that, disconnect and re-connect each one. Additionally, confirm that your liquid cooler is operating correctly; when you switch it on for the first few times, it should produce a gushing sound.
Look at error codes or analyze the beeps
Small screens that indicate the temperature or, in the event of an issue, an error code are standard on modern mainboards. To determine the meaning of a specific error code, consult your handbook. If you’ve thrown your handbook away, it can be found online or in the box.
Check up the meaning of an error code online if you’re unsure about it. Most likely, the question has previously been asked by someone else.
A beep or sequence of beeps may indicate a problem on motherboards without monitors. Keep an ear out for these and record how long each beep lasts. For instance, a memory problem could be indicated by two small beeps followed by a long beep.
Try a CMOS reset
The BIOS may occasionally need to be fully reset to its safe or default settings. For this reason, certain motherboards come with a unique “jumper” on the motherboard. Others feature a special “Clear CMOS” button.
Try different components
If you are still unable to solve it, consider taking some of the parts out. attempt replacing the graphics card first, then attempt switching to another one. Apply the same logic to RAM. You might need to try a different processor if it doesn’t work. Although it takes a lot of labor, there are times when there are no other choices.
Keep your gaming PC clean
Although your new PC will operate incredibly quickly right out of the box, we advise against piling too many apps on it. Sluggishness can occur even on sophisticated gaming setups when apps begin to run intensively in the background. Tidy up your computer to stop this from occurring.
Installing Avast Cleanup and turning on its integrated Automatic Maintenance feature is preferable. The integrated Disk Cleaner can be used to free up additional space for games. Also, other apps will go to sleep thanks to the Sleep Mode feature.
Why should I build my own gaming PC?
Why then should I construct my own computer? Why can’t I just get one from a company like Lenovo, HP, or Alienware? Yes, you can, is the response. However, a pre-built PC will probably cost more, and you won’t have as much options for what’s inside of it.
Numerous internet retailers offer a selection of a few processors, three or four distinct RAM module configurations, and a range of graphics card options. You can create anything you want when you design your own computer. You own it.
The bottom line
Building a gaming PC is a difficult task. I hope to have spared you some time by sharing my recommendations, which are based on my personal experience after months of researching the ideal components.
It may take up to three hours to assemble your PC; if issues arise, this time may increase. However, if you adhere to this tutorial, you ought to have no trouble constructing the gaming PC of your desires.