Essential Video Editing Tips For Beginners To Improve Skills will be described in this article. According to YouTube stats by Wyzowl, YouTube users upload almost 4 million videos daily. To ensure that your content gets noticed, you should edit it at a professional level. If you are a beginner, make sure to follow the tips compiled by experienced video editors to improve your skills.
Essential Video Editing Tips For Beginners To Improve Skills
In this article, you can know about Video Editing Tips For Beginners To Improve Skills here are the details below;
When deciding how to edit your video, you should consider how it will impact your viewers and what impression it will make on them. It will enable you to increase the retention rate and expand your audience. Below, you will find video editing tips and tricks that can improve your experience and make the most out of the Movavi Video Editor.
1. Get Rid of Unwanted Parts of Footage
The first thing that you should do is to carefully watch your footage and remove unnecessary parts without any regrets. For instance, you can remove the parts with a high level of background noise or conversations that you don’t find interesting. Some video editors cut out and save specific scenes, however, as a rule, they never use them afterward.
Besides, you should pay attention to dialogues and make long pauses shorter. You can also shorten a segment in which a person talks about less important topics. Otherwise, such scenes will bore your viewers, and they will stop watching your video.
Hack to use. Use cutaways, especially when editing videos in which 2 or more people speak. These effects are often used by editors who need to change the pace of a scene to focus a viewer’s attention on something.
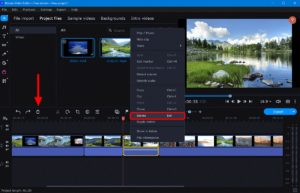
If you want to perform this task using Movavi Video Editor, select a scene that you want to cut out from the timeline. Tap on it to see the actions that you may perform, such as trimming, splitting, speed adjustment, deletion, etc. You can start by splitting the scenes. After selecting a specific segment, you may delete it.
2. Use Multiple Angles
If you don’t want your video to be dull, think about the angles you are going to use during the shooting. The longer your video is, the more angles you should use.
However, you should avoid changing the angles too often. It will distract a viewer from your content and make them feel as if their heads were spinning. You may use 2-3 shooting angles for a YouTube video that lasts up to 1 hour.
Hack to use. Change the shooting angles instead of using transitions to ensure that your video looks natural. If you need to shoot a video of a walking person, you may remove most of your footage and show the moments when the person starts walking and then stops. To emphasize the duration, try showing these moments from different angles.
Your viewers will automatically re-create the missing fragment in their minds. It will enable you to give a dynamic feel to your video without adding extra effects.
3. Add Captions
By counting captions to your video, you can expand your audience and make it easier for viewers to understand what people talk about in your video. It’s especially important when you record videos of people who have an accent or speak a foreign language. Besides, by adding captions, you can make your video accessible to people with hearing disabilities.
You should also remember another important function to add subtitles, which will help you popularize your content. High-quality subtitles allow you to make your video easier to find on Google. They increase the online visibility of your content and make it accessible to a wider number of people.
Hack to use. You can either add captions to your video manually or use AI-driven tools to perform the same task more quickly. For instance, you may use such services as Submagic, VEED, Animaker, FlexClip, and others. Most programs require you to upload your video and select a language.
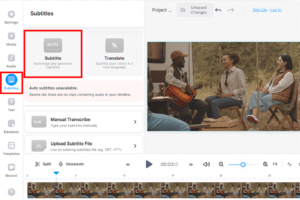
Artificial intelligence tools can recognize speed even when a person in a video doesn’t speak clearly. When captions get generated, you can customize their colors and fonts, as well as highlight the text.
4. Select the Pace
When talking about pace, people typically refer to the speed and consistency of a video. Many professionals who create videos struggle to make the pace of their clips balanced. Some segments of your video might be slower, while others might have a faster pace. Due to this, it might be difficult to watch them.
When editing your clips, take into account their rhythm and atmosphere. There is no need to add sharp transitions between scenes, as it’s better to keep the pace smoother. The speed of each segment should correspond to the speed of the next one. Besides, you can change the speed to ensure that it corresponds to the tone of the message that you want to convey.
Hack to use. To balance the pace, you can cut away to other scenes as a person continues talking. For example, if you need to edit a vlog, you may add a B-roll to convey your message clearly.
If you need to show two people talking to each other, be sure to show the reactions of each person when the other person speaks. It will allow you to add a dramatic or a comedy feel to your videos.
Using the Speed tool, you can make your video or audio slower or increase its speed. This option will be useful for situations when you need to synchronize your video and audio.
5. Add a Specific Feel to Your Video Using Colors
The color correction allows you to edit your videos in a consistent style. Even if you use footage
taken with different cameras and in different lighting conditions, you can fix these issues during the post-processing stage. You just need to adjust brightness, contrast, and WB to achieve the desired result.
At the same time, color grading allows you to give a special feel to your videos. If you are interested in this topic, you can use advanced video editing applications with professional color grading tools. You can also find plenty of apps with LUTs for beginners, which allow you to edit the colors in your videos more quickly. For instance, you can select between different presets to make your videos warmer or colder.
Hack to use. You can speed up your workflow using cinematic LUTs, which can be applied in a few clicks. There are plenty of LUTs created by the developers of such advanced video editing tools as Premiere Pro and other video editing software. Besides, their use will help you develop your visual eye, which is crucial for any creative professional.
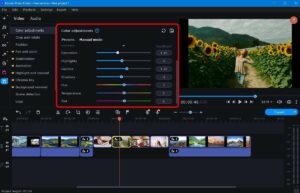
If you want to perform color correction manually, you will find the options you need in the Color Adjustments menu. Some of them help you enhance your video automatically, while others allow you to manually adjust contrast, brightness, saturation, and other parameters using convenient sliders.
6. Make Audio Balanced
When editing your clip, pay attention to your audio as it is no less important than your video footage. If an audio track sounds unbalanced, or you hear some distorted sounds, your video might be difficult to watch. This is why you should focus on the quality of your sound when editing.
To make your audio well-balanced, ensure that the audio levels of speech in your video remain the same. Pay attention to imbalances that might happen when different people speak to each other. If you have a video of many people talking, you will notice that some of them sound louder. However, you can easily reach a more consistent result during the post-production stage.
Hack to use. You can edit the sound using a Windows and Mac video editor or opt for dedicated audio editing tools. If you don’t have loads of experience, you may use such audio editing software for newbies as AudioDirector, MyEdit, Acon Digital Acoustica, etc.
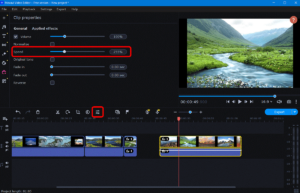
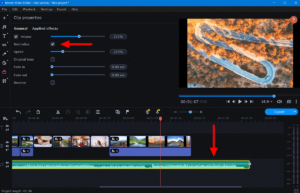
What makes Movavi Video Editor so convenient to use is that it comes with an in-built audio normalizer that allows you to make the sound in your videos well-balanced. Select the Add Files option and pick a file that you want to normalize. The program supports different formats. When you see your file in the Media Bin, you can drag it onto the Timeline.
Double-click your file on the Timeline to access the Clip Properties menu. Put the checkmark in the Normalize box on the General tab. It will allow you to make the sound better balanced.
7. Select Suitable Music
If you choose the wrong soundtrack, your video editing efforts might go in vain, as music sets the rhythm and tone as well as emphasizes the mood in a clip. In case your video includes highly dramatic or dynamic scenes, be sure not to use calm music in it. It’s one of the most important video editing tips you can use.
Hack to use. Remember about copyright. Such platforms as Facebook and YouTube pay special attention to videos that include copyrighted tracks. They quickly take them down, so you won’t be able to enhance your video by adding popular tracks.
These days, you can find plenty of platforms that offer collections of royalty-free music. Some of them are available for free, while others are paid. Due to this, you will easily find tracks that are perfect for your video.
Make sure to read the terms of use. It will make it easier for you to understand whether you are allowed to use royalty-free music to improve your videos in the way you see fit. Some licenses don’t allow you to use music for commercial purposes.
If you have contacts of people who created the audio track you like, you can reach out to them and ask them for permission to use their works.
8. Focus on the Story
When working on the final cut, you often need to decide which shots you want to leave and which ones to omit. To make the right editing decisions, be sure to think about how your choice affects the story you are trying to tell. It’s important for all types of stories, whether you prefer to create videos based on fiction or work on ads.
Some editors who don’t have extensive experience might add effects for the sake of making their content more eye-catching. They might also select the nicest-looking video segments.
However, it’s hardly the smartest approach, as these choices might make your viewer forget about the main point that you are trying to bring across. You need to consider the main idea of your video and structure it in a way that will make it easier for a viewer to grasp it.
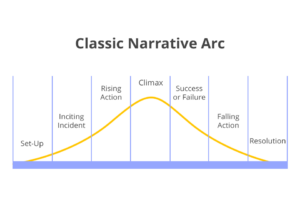
Hack to use. It’s better to build a traditional narrative arc and ensure that it has the following structure:
- Exposition
- Rising action
- Climax
- Falling action
- Resolution
It doesn’t matter what type of videos you work with as all the stories should follow the same progression. A traditional narrative arc implies that every story has a slow-paced beginning, a middle part with a build-up, and a conclusion. We are used to such stories, as they make it easier for us to learn about the unique journey of the main character.
9. Back Your Work Up
You can utilize a combination of editing apps that automatically save your progress and create backups. Such options will come in handy for those who want to restore the earlier versions of their projects. However, these backups are typically stored on the same drive where your project is stored. It means that if your hard drive stops functioning properly, you will lose access to your files.
Due to this, it might be better to create backups in different locations to prevent the loss of your data. To stay on the safe side, create backups of your files on an external hard drive and a cloud server. Make sure to save your progress at the end of each session. If you use such video editing tricks, it will guarantee that you will be able to restore your face in case anything happens with your hard drive.
Hack to use. You may use a variety of cloud storage platforms for storing backups of your videos, including pCloud, Google Drive, Dropbox, MEGA, and Icedrive, which allow you to store even large videos.
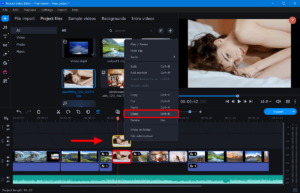
If you want to create a backup when using Movavi Video Editor, open the Settings menu & click on the Complete a backup option. You just need to select a video that you want to copy, indicate the folder where it is stored, and wait until your backup gets created. To restore your video, click on the Settings menu and pick the Restore from backup option.
10. Give Yourself Some Time
When you work on a project for a long time, you can stop seeing simple mistakes. If your project requires you to use complex editing techniques, it might be better to divide the process of editing into multiple stages and make pauses between them.
In some cases, you might notice that some ideas that you consider to be creative don’t look unique and unusual the next day. This is why you can think about ways of improving your videos. Besides, you might decide to experiment with other video software features that can enhance your work.
Hack to use. Experienced video editors make sure to re-watch their works a day before their clips get published. As a rule, they notice minor imperfections that they fail to see when working on the project. It allows the specialists to make the final edits.
Conclusion
The key to enhancing your video editing mastery is consistent practice. Experiment with different editing techniques, try out new effects, and challenge yourself to edit various types of footage. The more you practice, the better you’ll become at manipulating and transforming RAW footage into a captivating story.
While it’s important to learn from others, it’s equally important to develop your own unique editing style. Experiment with different editing techniques, transitions, color grading, and music choices to find a style that resonates with you. Having a distinct style will make your work stand out and help you leave a lasting impression on your audience.