How To Configure SSH Keys Authentication With PuTTY And Linux Server will be described in this post. Leaving the SSH port open and unrestricted may allow invasions for public instances if configurations or unexpected software vulnerabilities exist. To help stop intrusions, follow these best practices:
Limit your security group so that only trusted IPs, like business network IPs, are allowed to connect incoming to port 22.
Usually, you use a client like Telnet or Putty to enter your username and password in order to connect to a remote instance on AWS. It is inconvenient and unsafe to use an excessively lengthy password each time you wish to begin a session.
How To Configure SSH Keys Authentication With PuTTY And Linux Server
In this article, you can know about How To Configure SSH Keys Authentication With PuTTY And Linux Server here are the details below;
Using keypairs, which consist of a public key and a private key, you may improve security. Your public key is stored on the host you wish to connect to, and your private key is kept confidential. These encrypted keys are usable in stored sessions. The host helps you use your private key to log in remotely and creates a connection without asking for a password.
Because a private key is encrypted, keeping it is still safer than keeping a password.
The owner of the key can only log in, making key-based SSH authentication more secure. This blog explains how to convert to key-based SSH authentication. In this example, PuTTY is our SSH client, and we’re utilizing a Windows computer.
1. Download Putty from https://putty.org/

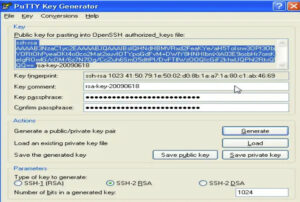
2. Generate a private and public key pair using puttygen (its get’s installed, when you install putty)
Launch PuTTYgen, click the Generate button, and continue dragging the mouse until the time keys appear. Enter your key passphrase (choose one that is “hard to guess”) after the keys have been generated. You can choose not to do this. You don’t need to enter the passphrase to proceed. Keep the public key safe. Keep the private key safe.
3. Configure your Linux server (create a user, save the public key)
Let’s assume that test is your usual login name for the purposes of this guide; please replace it with a regular login name.
On the shell, as root, type:
test-added user with disabled password
You will be prompted to enter certain information, like the user’s true name (a blank string will do).
Next, make and modify a file named authorized_keys inside that folder. Using the instructions below
approved_keys
Your public SSH key should be copied and pasted there on ONE LINE (this is crucial!). Once the key has been pasted, save the file by hitting the ESC key once on the keyboard and entering:wq at the signal. Also check Physical Site Audit Software
Note:
- The email@example.com should not be added at the end of the line.
- The BEGIN PUBLIC KEY and END PUBLIC KEY should not be added.
- The rsa-key-20090614 should not be added at the end.
- Verify that ssh-rsa appears at the start.
The file entry ought to resemble the one displayed below.
Now, modify the permission to the authorized keys file by using the following command at the prompt. In the previous stage, we provided the ssh directory 700 file permission, so all the files and folders inside this directory will have this permission.
Sort:
authorized_keys2 chmod 600
4. Add Private key to PuTTY SSH authentication agent
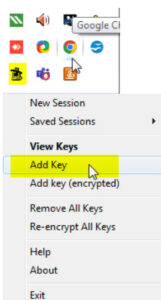
Launch PAGEANT.EXE, the PuTTY SSH authentication agent (which is installed by Putty).
Panthera can be found on the system tray after it has been started. Choose “add key” with a right-click on the system panel icon. When adding the key, choose your private key file and enter your passphrase, if you have provided one. In essence, The Pageant is a passphrase keeper.
5. Use PuTTY to connect to your server
To establish a connection, launch PuTTY and log in using the EC2 instance’s IP address, test@ IP_address. I’ve provided 1.2.3.4 as the IP address for the demo.
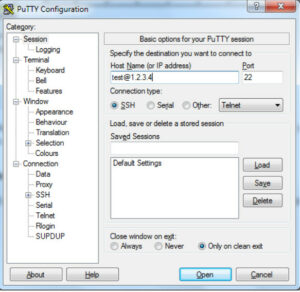
When you click “open,” you can log in without a password.
UseCases when the aforementioned technique is useful.
- In the event that a user within your company needs a different key pair to access the system, you can create a new key pair and duplicate the public key in the ~/.ssh/authorized_keys file.
- You can remove the public key from the instance and replace it with a new one if you wish to stop someone who has a copy private key (.pem file) from connecting to your instance (for instance, if they have left your company).
- The public key material copied instance to the AMI when you generate a Linux AMI from an instance. The public key from the first instance is included in the new instance that you run from the AMI. You can delete the public key from the original instance before generating the AMI in order to stop someone with the private key from connecting to the new instance. Also check Shopify Lazy Loading
You need to be able to connect to your instance in order to add or remove a key pair. You won’t be able to add or update a key pair if you can’t connect to your instance because you lost your current private key or didn’t launch it with a key pair. You may be able to recover your private key if you misplaced it. You won’t be able to connect to your instance if it was started without a key pair unless you choose an AMI that is set up to provide users with an alternative login method.
To change or add a set of keys
- Using the Amazon EC2 console or an outside program (Putty), generate a new key pair.
- Take out the public key from the newly created key pair.
- Using your current private key, establish a connection to your instance.
- Open the instance’s.ssh/authorized_keys file with your preferred text editor. Copy the public key data from your new key pair and paste it beneath the current public key data. Conserve the file.
- After disconnecting from your instance, see whether you can re-connect with the updated private key file.Cut the connection.
- To replace an already-existing key pair, log in to your instance and remove the original key pair’s public key information from the.ssh/authorized_keys file.